About our White-label image and graphic editor
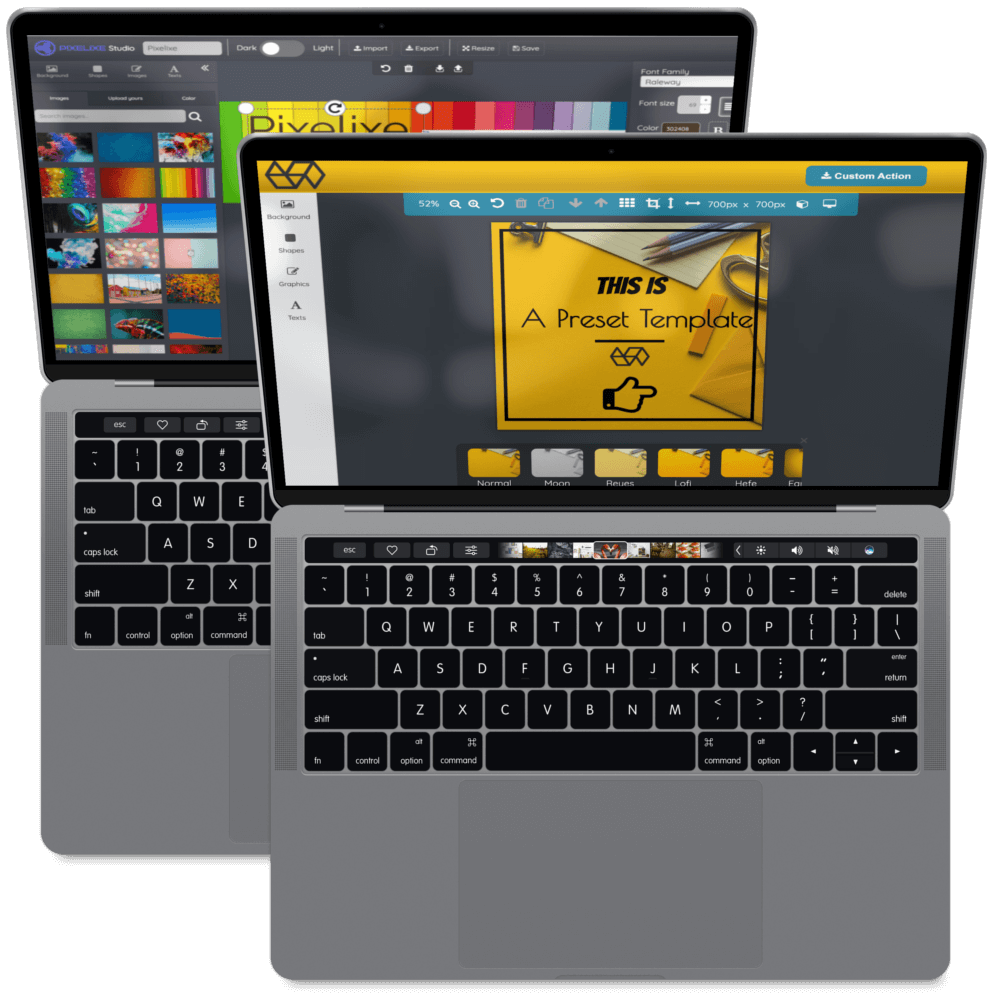
Setup your logo, your colors, your assets, create your custom templates and integrate a graphic, photo or PDF editor into your webapp as a white label product. The studio offers millions of stock photos, fonts and icons with one objective in mind, to make sure designs created by your users will be unique and stunning.
Customization:
No coding is required to customize your white label version with our easy-to-use customization tool.Integration:
Remain in full control over the user experience and your integration workflow:- NoCode option 1: your users download their creations directly from the editor.
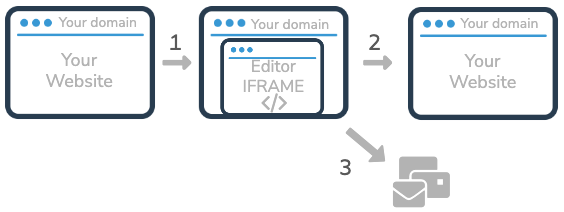
- NoCode option 2: the editor send the edited documents into your email INBOX in real time.
Ideal to start a Zapier, Notion or Integromat Workflow. - Option 3: the editor push the edited documents in real time on your server endpoint (WebHook). This option also work without code with Bubble.io backend API workflow.
Either way, after editing, your users will be redirected on the page of your choice. You remain in full control over the user experience and your expected integration workflow.
Domain name:
Keep your domain name without any configuration using IFRAME to integrate your editor.Translation:
The white label editor is already translated in:- English (en)
- Portuguese (po)
- Italian (it)
- French (fr)
- Turkish (tr)
- Dutch (nl)
Getting Started
Introduction
Remain in full control over the user experience and your integration workflow:
When your users will use the editor, 2 events will occur between your website and the editor. Discover below different ways to integrate the white label editor to fit your use case.
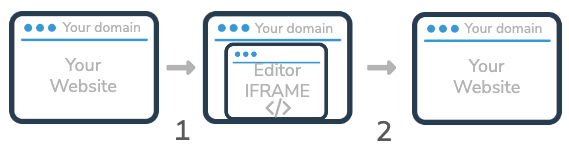
- 1 - The editor opening event
- 2 - The editor closing event
1 - The editor opening event
Several ways to start the editor (NoCode required):
- Upload image/photo option
The editor will automatically display a popup inviting your user to upload an image. - Custom templates option
The editor will automatically display your custom templates (made with your account). - Create blank document option
The editor will display a blank canvas with custom size of your choice. - Edit specific document option
The editor will open an already existing document. - Default templates option
The editor will display standard Pixelixe's templates.
Test our online demo to test the options
2 - The editor closing event
Several ways to close the editor:
- Option 1 (NoCode):
Your users download their creations directly from the editor. - Option 2 (NoCode):
The editor send edited documents into your email INBOX in real time.
Ideal to start a Zapier, Notion or Integromat Workflow triggered by incoming emails. - Option 3 (Code or NoCode):
The editor push the edited documents in real time on your server endpoint (WebHook).
For option 2 and 3, the "closing" event is triggered when your users finish editing and click on the customizable "call-to-action" button ("Download" label by default). Keep in mind you can rename this "call-to-action" button label and change its color from the "Customization tool" accessible from your Pixelixe account.
Option 1
Let your users download their creations directly from the editor.
With this option, your users can create and download graphics indefinitely without leaving the editor. No coding required to set it up.
Option 2
The editor will send edited documents created by your users into the email INBOX of your choice as soon as they finish editing and redirect your users on the page of your choice on your site.
Tips: Display an acknowledgement to your users: Ex "We successfully received your design and we will notify you as soon as bla bla bla.."
This option is ideal if you want to trigger an Integromat, Zapier or Notion workflow for example
-> Integromat Email integration documentation-> Integromat Email integration documentation
-> Notion Email integration documentation
Option 3
The editor push the edited documents in real time on your server and redirect your user on the page of your choice on your site.
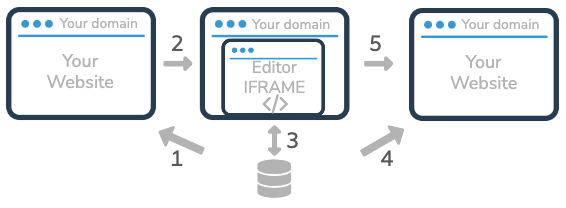
- 1 - Display custom templates or your logged-in user's designs directly on your website (Search document API)
- 2 - Notify the editor to open a specific document selected by your user (document_uid as a parameter of the iframe)
- 3 - The editor saves automatically documents edited by your users
- 4 - The editor will push documents created/edited by your users on your server (payload documentation)
- 5 - The editor will redirect your users on the page of your choice
With option 3, the editor will store the edited document on your Pixelixe Storage space and instantly post a JSON Payload containing direct document URLs (JPEG, HTML (or PDF)) and a unique document identifier (called document_uid) to your server endpoint (webhook_url to configure from our platform UI).
This way, you are free to access the edited document for the usage of your choice. You can also save the document_uid to let your users re-edit their creative from the editor whenever they want.
As you understood, passing a document_uid as a parameter of the iframe will automatically open it.
By the way, option 3 also work without code with Bubble.io backend API workflow.
Set up your account
Once logged-in to your Pixelixe account, click on the "Integration / API" menu from the left panel. Then, click on the "White-label" Settings submenu.
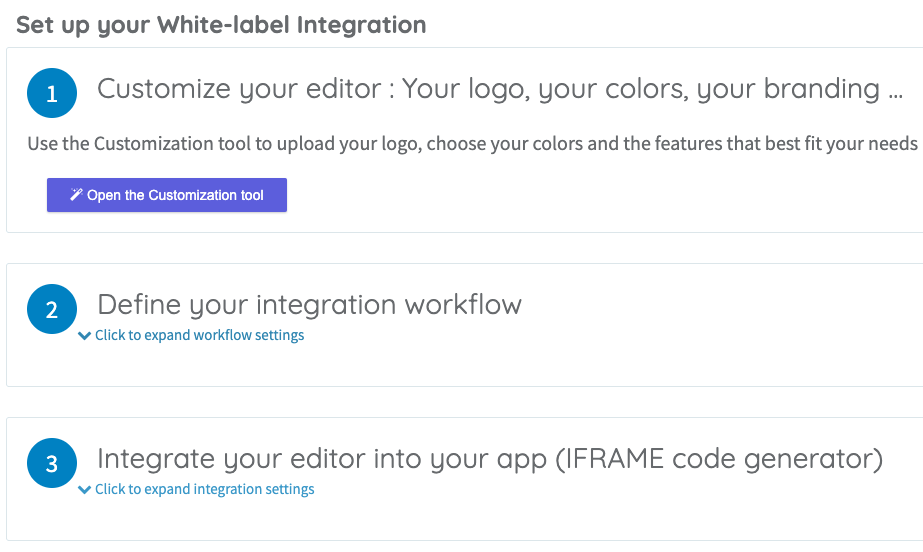
Only 3 steps are required to finish your integration:
- 1 - Customize your editor
Add your logo, choose your colors and the features you want from our easy-to-use customization tool. - 2 - Define your integration workflow
Define what will happen when your users will have finished editing between Option 1, 2 or 3 (see above) . - 3 - Integrate the editor into your app
Define the editor opening event options simply by checking checkboxes and copy/paste the generated iframe code to your website.
1 - Customize your editor
Customizing the editor is really easy. Just click on the "Open the customization tool" button and the tool will open and let you upload a logo, change colors and save.
2 - Define your integration workflow
This is the step where you decide what must happen when your users finished editing between the 3 options seen above.
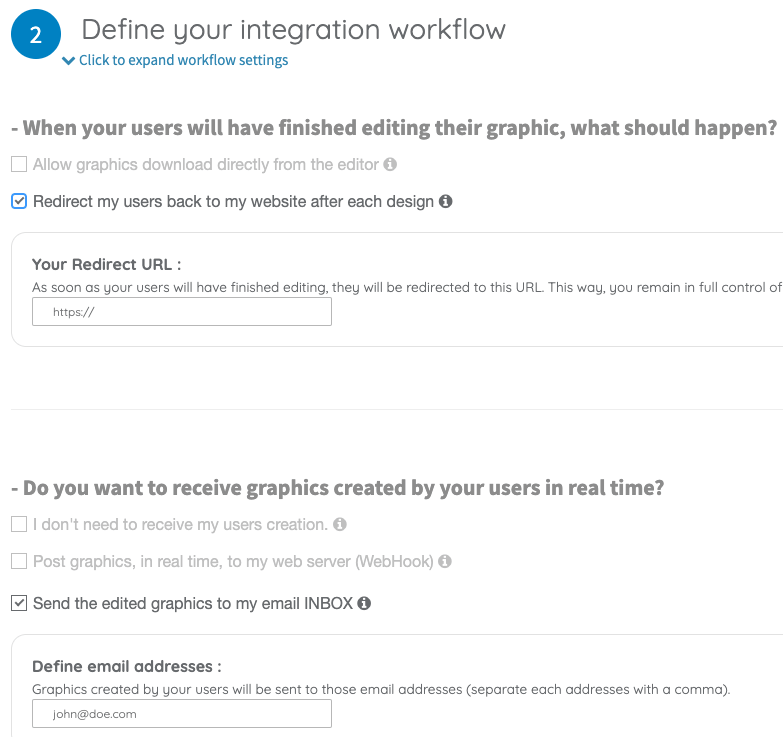
As you can see from the screenshot above, you must answer to 2 questions with several options:
What should happen when your users will have finished editing their graphics?
Choose among the 2 following options. If you select to redirect, a text box will slide down to let you define the "redirect" URL of your choice.
- Enable graphics download directly from the editor
- Redirect my users back to my website after each design
Do you want to receive graphics created by your users in real time?
- I don't need to receive my users creation.
- Post graphics, in real time, to my web server (WebHook)
- Send the edited graphics to my email INBOX
For options 2 and 3, a text box will slide down to let you define either your server endpoint (webhook) or the email address of your choice.
Don't forget to click the "Save" button when you are done.
3 - Integrate the editor into your app
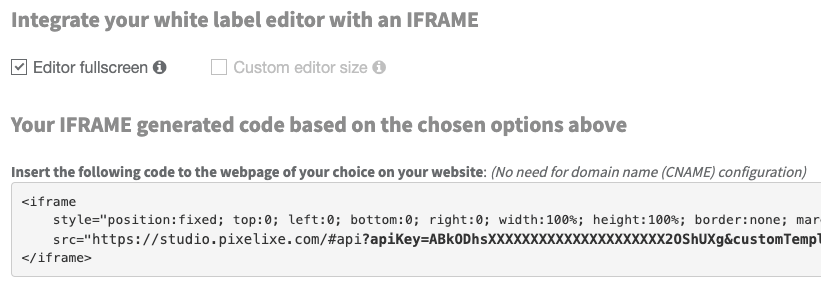
The final step is to define the opening option of your choice and copy/paste the generated iframe code or iframe url on your website.
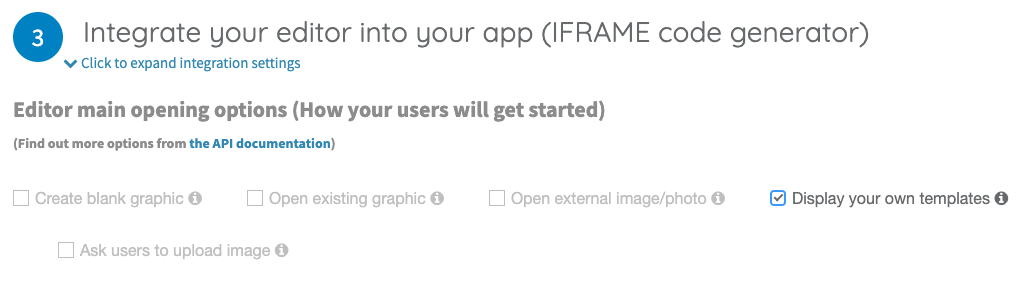
Among the options, you can choose either:
- Create blank graphic
- Open existing graphic
- Open external image/photo
- Display your custom templates
- Display Pixelixe's standard templates
- Ask users to upload an image
-> Embed Pixelixe iframe in your WIX Website
-> Embed Pixelixe iframe in your Wordpress Website
Paste the generated iframe code on your website and voila! Your white-label editor is set up.
Can I access designs created by my users?
NoCode: If you are not a developer, our white label editor can also be configured to send creatives via email (Ideal to trigger action on your Zapier or Integromat workflow).
Is it possible to integrate and test the white-label editor in our development, staging and production environment?
For example, if you want to change the endpoint on your side in which our API will push designs created by your users, you can overwrite the URL when calling this API on your dev or staging environment.
Ex: add &webhook_url=https%3A%2F%2Fyour-dev-website%2Fyourwebhook_url to your iframe URL to overwrite the webhook URL. (TIPS: Don't forget to encode your URL before passing it as a parameter: encodeURI())
Check the parameter options for the iframe
Can we disable some of the editor features?
For example, if you want to let our users update text but not the background image, this is completely possible. If you want to let users only choose a background image but not add another text, this is also possible.
How many users can we have with one API key?
For example, if you want to let our users update text but not the background image, this is completely possible. If you want to let users only choose a background image but not add another text, this is also possible.
Is the White-label editor compatible with no-code or CMS platform such as Wordpress, Wix, Bubble, Weebly, etc?
- NoCode: The simplest integration does not require any code at all. The simplest integration consists of embedding the editor in your website using our generated iframe code (Copy/Paste from our platform UI) and letting your users download their designs directly from the editor.
- NoCode: Another easy way to integrate with a deeper integration into your business workflow is to set up your editor to receive graphics edited by your users into your email INBOX and redirect your users to the page of your choice. For example, you can confirm to your users that you received their document successfully on your redirect page and process their documents whenever you want. (Ideal for triggering actions and NoCode workflows)
- IT integration (Coding required): An even deeper way to integrate into your business workflow is to set up your editor to receive graphics edited by your users in real time on a server endpoint (webhook URL of your choice). For example, if you want to ask your users for payment before letting them download their designs, or if you want to save their designs and let them re-edit later. The editor will push a JSON payload in real time to your server: Read the documentation here.
As you can see, we made sure it is possible to integrate the white-label editor in various ways to match your project requirements and skillset.
Keep in mind, you will receive full support from our team during your integration phase.
Do I need a developer to embed the white-label editor to my website?
We offer 2 ways to integrate our solution without any code at all.
But the most used integration our customers choose is a deep integration in their tools using code:
- NoCode: The simplest integration does not require any code at all. The simplest integration consists of embedding the editor in your website using our generated iframe code (Copy/Paste from our platform UI) and letting your users download their designs directly from the editor.
- NoCode: Another easy way to integrate with a deeper integration into your business workflow is to set up your editor to receive graphics edited by your users into your email INBOX and redirect your users to the page of your choice. For example, you can confirm to your users that you received their document successfully on your redirect page and process their documents whenever you want. (Ideal for triggering actions and NoCode workflows)
- IT integration (Coding required): An even deeper way to integrate into your business workflow is to set up your editor to receive graphics edited by your users in real time on a server endpoint (webhook URL of your choice). For example, if you want to ask your users for payment before letting them download their designs, or if you want to save their designs and let them re-edit later. The editor will push a JSON payload in real time to your server: Read the documentation here.
Keep in mind, you and your developer will receive full support from our team during your integration phase.
Our solution relies on web standards (HTTP, REST, IFRAME) so any web developer will be able to integrate Pixelixe seamlessly.
Is Pixelixe working on mobile devices?
Is it possible to translate the white-label editor in a foreign language?
Youc can choose the language of your choice programmatically if you have a multi-language website adding the "&lang=fr" (French) or "&lang=po" (Portuguese) parameter in your iframe URL.
Can I use my own company logos and graphics?
Read the documentation here.
Can I use my own custom image dimensions or create custom templates?
- Image Editor mode Open the studio and ask users to upload an image or photo
- Template mode 1 Create your own templates and let your users choose among templates.
- Template mode 2 Offer Pixelixe's default templates and let your users choose among them.
- Start from scratch mode Create a blank document with the dimension of your choice.
- Edit existing doc mode Edit a specific document (already existing).
Example 1: Add &width=500&height=600 to create ab blank document with custom size.
Example 2: Add &templates=true to display Pixelixe's default templates.
Example 3: Add &customTemplates=true&customTemplateFolderPath=YOUR_FOLDER_NAME to display your own templates.
Example 4: Add &allowUploadOnly=true to open the upload image popup first within the editor.
Example 4: Use either &document_uid= or &graphicUrl to open an existing document.
Access the full list of parameters here.
What is a document UID (document_uid) ?
Access the API documentation here.