
Introduction
Welcome to the Pixelixe API! Pixelixe API enables you to enhance your webapp with automated image generation and a customizable graphic editing tool.
Pixelixe offers end-to-end solutions for manual or automated image generation.
Our white-label editor and APIs can easily be integrated into any webapp to let your visitors and users create, search, update, delete their own documents (designs) and push them wherever you need them in real time.
Additionally, any document generated from the editor can become an API. Thanks to our powerful "Image Automation API", your app can generate unlimited variations of graphics on the fly (social media content, banners, etc..).
Authentication
To test your API key:
curl "https://studio.pixelixe.com/api/authentication/v2" \
  -H "Authorization: Bearer api_key"
The above endpoint returns JSON structured like this:
{
    "status": "success",
    "message": "Authenticated successfully"
}
Make sure to replace
api_keywith your API key.
Pixelixe uses API keys to allow access to the API. You can get an API key by creating an account in Pixelixe.
Pixelixe expects the API key to be included in all API requests to the server.
For the front-end API such as the insertion of the editor into your webapp, using the public API Key is strongly recommended. This public API key is accessible from your Pixelixe back-office.
For back-end APIs (every other API), the API key can be set up in a header that looks like the following:
Authorization: Bearer api_key
Editor API
Documents are the reusable designs that are created and saved from the Pixelixe editor. Documents can be anything you need them to be: banners, social media graphics, email images, custom-sized content, etc. Documents can be exported in either PNG, JPEG, HTML or PDF.
You or your users can design a Document using the Pixelixe editor, of course, but you can also use Documents as reusable templates. For example, to offer and list custom clickable preset templates on your website for your customers or even more if you want to automatically generate variations of your graphics and images with our API.
Basically, every Document can become an API. Every text, color and image in a Document (aka template) can be modified via our API on the fly!
Customize your white-label editor
The Pixelixe platform provides an easy-to-use Customization tool (no code required). To get started, log in to access your Pixelixe dashboard. From the Dashboard, select the "White label Editor API" section from the left or central panel. Then, you will be asked to "Customize your editor".
Search Documents
curl "https://studio.pixelixe.com/api/document/search/v2?document_uid=32f59312815640e186cf17fe3fd5c1d9" \
  -H "Authorization: Bearer api_key"
The above endpoint returns JSON structured like this:
{
   "api_key": "3r3C7FAmlofEdsVLlp8EsGM6MdD3",
   "documents": [
      {
         "name": "Demo-template-1",
         "width": 600,
         "height": 600,
         "document_uid": "32f59312815640e186cf17fe3fd5c1d9",
         "last_modification_date": "03-08-2021_20:38:21:579",
         "public_png_url": "https://studio.pixelixe.com/storage/file/32f59312815640e186cf17fe3fd5c1e8/Demo-template-1-03-08-2021_20%3A38%3A21%3A579.png",
         "public_html_url": "https://studio.pixelixe.com/storage/file/32f59312815640e186cf17fe3fd5c1e8/Demo-template-1-03-08-2021_20%3A38%3A21%3A579.html",
         "available_modifications": {
            "modifications": [
               {
                  "name": "background-image",
                  "image_url": "Change the background image using any URL here",
                  "width": "916.328px",
                  "height": "600px",
                  "visible": "true"
               },
               {
                  "name": "text-1",
                  "type": "text",
                  "text": "Some text example that can be modified",
                  "color": "rgb(0, 0, 0)",
                  "font-size": "108px",
                  "visible": "true"
               },
               {
                  "name": "icon-3",
                  "type": "icon",
                  "color": "rgb(0, 0, 0)",
                  "visible": "true"
               }
            ]
         }
      }
   ]
}
This endpoint either retrieves all Documents attached to your Pixelixe account (with no parameter) or can be used with an optional parameter as described below.
Pagination is optional. Set limit and offset to page through large lists. When used, the response includes a pagination object with total, count, limit, offset and has_more.
HTTP Request
GET https://studio.pixelixe.com/api/document/search/v2
Optional Query Parameters
| Parameter | Description | Use Case |
|---|---|---|
| user_uid | Unique User identifier | Get all Documents created by this specific user. |
| document_uid | Unique Document identifier | Get a specific Document. |
| created_by | 2 options owner or api-editor |
Get all Documents created either by you (as the owner of the Pixelixe account), either by all your white-label editor users api-editor. |
| width | Get a list of documents with the same width | For example, to display on your site all 400x400 banners. |
| height | Get a list of documents with the same height | For example, to display on your site all images with the same height. |
| folder_path | Folder path | List document stored in a specific folder. |
| limit | Integer | Limit the number of results returned in one page. |
| offset | Integer | Skip the first N matching documents before returning results. |
Search Design Sets
curl "https://studio.pixelixe.com/api/designset/search/v2?design_set_uid=7b21ff3e142311a7b9288ff2374c1b5f&limit=10&offset=0" \
  -H "Authorization: Bearer api_key"
The above endpoint returns JSON structured like this:
{
  "api_key": "YOUR_API_KEY",
  "design_sets": [
    {
      "design_set_uid": "7b21ff3e142311a7b9288ff2374c1b5f",
      "name": "Promo Social Pack",
      "category": "social",
      "source_document_uid": "4de9c817a4f74c55b7c2fe4fd0ce1a11",
      "source_document_name": "Master Layout",
      "last_modification_date": "03-22-2026_10-20-00",
      "available_modifications": {
        "modifications": [
          {
            "element_name": "headline",
            "type": "text",
            "text": "Spring Launch"
          },
          {
            "element_name": "background-image",
            "type": "image",
            "image_url": "Replace with any public image URL"
          }
        ]
      },
      "formats": [
        {
          "id": 1,
          "name": "Instagram Post",
          "width": 1080,
          "height": 1080,
          "document_uid": "5c00d4bc927d4c37b2d3627ba6f2614e",
          "template": true,
          "template_url": "https://studio.pixelixe.com/open-document.html?document_uid=5c00d4bc927d4c37b2d3627ba6f2614e",
          "public_png_url": "https://studio.pixelixe.com/storage/file/.../5c00d4bc927d4c37b2d3627ba6f2614e.png"
        },
        {
          "id": 2,
          "name": "Instagram Story",
          "width": 1080,
          "height": 1920,
          "document_uid": "8f1a8d9f0bc14bcbbd644a6410e4bc12",
          "template": true,
          "template_url": "https://studio.pixelixe.com/open-document.html?document_uid=8f1a8d9f0bc14bcbbd644a6410e4bc12",
          "public_png_url": "https://studio.pixelixe.com/storage/file/.../8f1a8d9f0bc14bcbbd644a6410e4bc12.png"
        }
      ]
    }
  ],
  "pagination": {
    "total": 1,
    "returned": 1,
    "limit": 10,
    "offset": 0,
    "has_more": false
  }
}
Use this endpoint to list your reusable Pixelixe Design Sets and their linked formats. The Design Set is only the container. Public asset URLs belong to the child formats, not to the Design Set itself.
The Design Set can also expose available_modifications at the root level. This value comes from the source document (source_document_uid) and should be treated as the source of truth for editable fields before calling the Image Automation API or the bulk Create Multiple Images API.
HTTP Request
GET https://studio.pixelixe.com/api/designset/search/v2
Optional Query Parameters
| Parameter | Description | Use Case |
|---|---|---|
| design_set_uid | Unique Design Set identifier | Get one specific Design Set. |
| designset_uid | Compatibility alias | Legacy alias for design_set_uid. |
| source_document_uid | Unique source Document identifier | Find the Design Set linked to one source template. |
| category | Design Set category | List only the Design Sets from one category. |
| limit | Integer | Limit the number of Design Sets returned in one page. |
| offset | Integer | Skip the first N matching Design Sets. |
Create or Update a Document
- Example 1: Open with the image editor mode
<iframe
    width="1200"
    height="1080"
    allowfullscreen
    frameborder="0"
    src="https://studio.pixelixe.com/#api?apiKey=api_key&allowUploadOnly=true" >
</iframe>
The above HTML code will ask users to start uploading their own image.
- Example 2: Open an image from a URL
<iframe
    width="1200"
    height="1080"
    allowfullscreen
    frameborder="0"
    src="https://studio.pixelixe.com/#api?apiKey=api_key&imageUrl=https://any-website.com/any-image.png" >
</iframe>
The above HTML code will embed your customized (white-label) editor into your website and open the following image
https://any-website.com/any-image.png.- Example 3: Create a blank Document (with custom size)
<iframe
    width="1200"
    height="1080"
    allowfullscreen
    frameborder="0"
    src="https://studio.pixelixe.com/#api?apiKey=api_key&width=1000&height=300" >
</iframe>
The above HTML code will embed your customized (white-label) editor into your website and open blank canvas with the following size: width: 1000px & height: 300px.
- Example 4: Offer your own templates (saved graphic) to your users
<iframe
    width="1200"
    height="1080"
    allowfullscreen
    frameborder="0"
    src="https://studio.pixelixe.com/#api?apiKey=api_key&customTemplates=true&allowCustomFormat=false" >
</iframe>
The above HTML code will automatically display your saved documents (as templates).
- Example 5: Open and update an existing Document
<iframe
    width="1200"
    height="1080"
    allowfullscreen
    frameborder="0"
    src="https://studio.pixelixe.com/#api?apiKey=api_key&document_uid=32f59312815640e186cf17fe3fd5c1d9" >
</iframe>
The above HTML code will embed your customized (white-label) editor into your website and open an existing Document with the following uid: 32f59312815640e186cf17fe3fd5c1d9.
- Example 6: Open with the PDF editor mode
<iframe
    width="1200"
    height="1080"
    allowfullscreen
    frameborder="0"
    src="https://studio.pixelixe.com/#api?apiKey=api_key&pdf=true&pdfMargin=20&width=1000&height=1000" >
</iframe>
The above HTML code will embed your customized (white-label) editor into your website and open a blank canvas with the following size: width: 1000px & height: 300px ready to be exported as PDF with a margin of 20 px.
- Example 7: Open the editor translated in Portuguese
<iframe
    width="1200"
    height="1080"
    allowfullscreen
    frameborder="0"
    src="https://studio.pixelixe.com/#api?apiKey=api_key&lang=po" >
</iframe>
The above HTML code will embed your customized (white-label) editor into your website and open the editor translated in Portuguese.
- Example 8: Overwrite your server endpoint (webhook_url) - Convenient for integrating in your Dev or staging envs
<iframe
    width="1200"
    height="1080"
    allowfullscreen
    frameborder="0"
    src="https://studio.pixelixe.com/#api?apiKey=api_key&webhook_url=https://staging.yourdomain.com/endpoint" >
</iframe>
This will overwrite your configured and saved webhook_url (Recommended only to run tests & QA).
Editing a Document can be done using the Pixelixe graphic and image editor. Pixelixe offers a free online editor available to anyone at https://studio.pixelixe.com/.
This editor can be configured and customized by subscribers from their account (no-code required), and then be integrated into any website using an IFRAME. (iframes are HTML elements that can be inserted anywhere within a webpage layout or fullscreen)
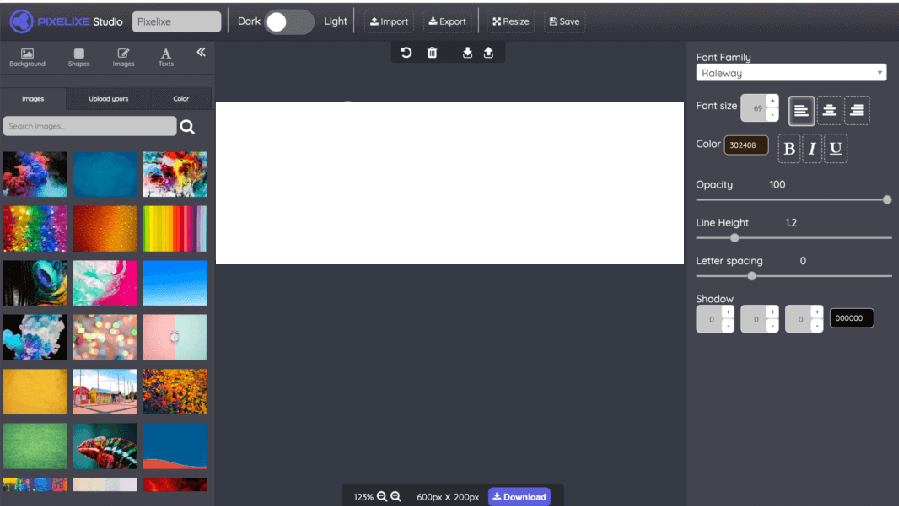
Opening the editor: Integrate the editor into your website with an IFRAME
https://studio.pixelixe.com/#api?apiKey=public_api_key
WARNING: The minimum iframe width to display the editor is 1000 px (pixels).
Optional Parameters
| Parameter | Description | Use Case |
|---|---|---|
| width | Width of a new blank document (integer) | Use the width and height parameters (pixel) to open the editor with a new blank document sized with those dimensions. |
| height | Height of a new blank document (integer) | Use the width and height parameters (pixel) to open the editor with a new blank document sized with those dimensions. |
| document_uid | Unique Document identifier | Open and update a saved Document. |
| graphicUrl | Direct URl to HTML exported graphic | Open and update a remotely stored Document (Cross-Origin Resource Sharing (CORS) must be enable: Access-Control-Allow-Origin: https://studio.pixelixe.com set up in your HTTP Headers). Use encodeURI when passing the graphicUrl as an API parameter. Ex : https://yourwebsite/2Fyoururl.html will become https%3A%2F%2Fyourwebsite%2Fyoururl.html. |
| user_uid | Unique User identifier | Match connected users on your site with their documents. you can use the user_uid parameter to pass alongside each editor opening request (browser side) your internal "Customer" or "User" identifier data that will allow you to easily match "who created what" once our API will push (POST) designs created by your users to your server endpoint (webhook URL). You have full control over this user_uid so you can set whatever fits your need. |
| imageUrl | Any image URL | The imageUrl allow to open any remote image inside the studio with a basic URL &imageUrl=https://any-website.com/any-image.png. Use encodeURI() when passing the imageUrl as an API parameter. Ex : https://yourwebsite/yourimage.png will become https%3A%2F%2Fyourwebsite%2Fyourimage.png. |
| Enable PDF export | Set the optional pdf parameter to true &pdf=true in order to receive graphics created by your users in PDF format. |
|
| graphicName | Set the name of the graphic | Set the name of the graphic during the editor opening. We strongly recommend to use the encodeURI() method function to encode the graphicName to make sure to correctly handle special characters within the URI. |
| lang | Enable PDF export | Translate the editor in the language of your choice. Ex: &lang=fr. French (fr), Spanish (es), Dutch (nl), Turkish (tr), Portuguese (po), Italian (it), Russian (ru) and English (en) are already available. Contact us at inquiries@pixelixe.com if you need support for another language and we will help you set up your account with your translation. |
| templates | Display Pixelixe's default templates | Pass the templates parameter set to "true" &templates=true to display Pixelixe's default premade formats & templates when your embedded editor will open in your user's browser. (Check out our free studio to discover our templates. See example below). Combine this parameter with the allowCustomFormat to disable the custom format option. |
| customTemplates | Display your own templates | Pass the customTemplates parameter set to "true" &customTemplates=true to automatically display all graphics created from your Pixelixe account. This is the easiest way (no code required) to offer custom templates to your customers with the White Label editor. Combine this parameter with the allowCustomFormat to disable custom format option. |
| customTemplateFolderPath | Templates folder path | Optional, if you pass the customTemplates parameter set to "true", you might also want to display only templates located in a specific folder. (&customTemplates=true&customTemplateFolderPath=YOUR_FOLDER_NAME) |
| allowCustomFormat | Enable/Disable custom format | Pass the allowCustomFormat parameter set to "false" &allowCustomFormat=false if you don't want your users to choose a custom size (width & height) when entering the editor. This is useful if you want to restrict their use of the studio only to your templates and presets. |
| allowUploadOnly | Image Upload only | Pass the allowUploadOnly parameter set to "true" &allowUploadOnly=true if you want your users to upload their own image when entering the editor. This is useful if you want to offer an image editor to your users. |
| custom_field_1 | Add a custom parameter | Pass along each editor opening (from the browser) additional data. This custom_field data will be pushed back to your server endpoint (webhook URL) once your user will have finished editing. |
| custom_field_2 | Add a custom parameter | Pass along each editor opening (from the browser) additional data. This custom_field data will be pushed back to your server endpoint (webhook URL) once your user will have finished editing. |
| custom_field_3 | Add a custom parameter | Pass along each editor opening (from the browser) additional data. This custom_field data will be pushed back to your server endpoint (webhook URL) once your user will have finished editing. |
| custom_field_4 | Add a custom parameter | Pass along each editor opening (from the browser) additional data. This custom_field data will be pushed back to your server endpoint (webhook URL) once your user will have finished editing. |
| custom_field_5 | Add a custom parameter | Pass along each editor opening (from the browser) additional data. This custom_field data will be pushed back to your server endpoint (webhook URL) once your user will have finished editing. |
| webhook_url | Overwrite saved webhook_url | Pass a URL to overwrite your configured and saved webhook_url. This is convenient for testing or integrating your Development or Staging environments (QA). Use encodeURI() when passing the webhook_url as an API parameter. Ex : https://yourwebsite/yourwebhook_url will become https%3A%2F%2Fyourwebsite%2Fyourwebhook_url. |
| redirect_url | Overwrite saved redirect_url | Pass a URL to overwrite your configured and saved redirect_url. This is convenient for testing or integrating your Development or Staging environments (QA). Use encodeURI() when passing the redirect_url as an API parameter. Ex : https://yourwebsite/yourredirect_url will become https%3A%2F%2Fyourwebsite%2Fyourredirect_url. |
| overwrite | Overwrite loaded document | Set the optional overwrite parameter to true to ask the white label editor to replace (overwrite) the loaded document (loaded from document_uid for example). Set to false to automatically create a copy of the document. Setting it to false is convenient for templating purposes, if you want your users to benefit from your own custom templates without editing the original version of your template. Once they have created their copy, open the copy with &overwrite=true to let them edit their copy indefinitely. |
| forceRemoteGeneration | Image Automation API | Set the optional forceRemoteGeneration parameter to true to generate graphics using our Image Automation API instead of our embedded "in-browser" generator. This is a good solution if you are experiencing issues with non-Latin1 characters (such as Arabic, Greek, Chinese, Telugu, etc). The download time might be longer than the usual default engine, use it only if required. |
Get edited Document on your server using WebHook
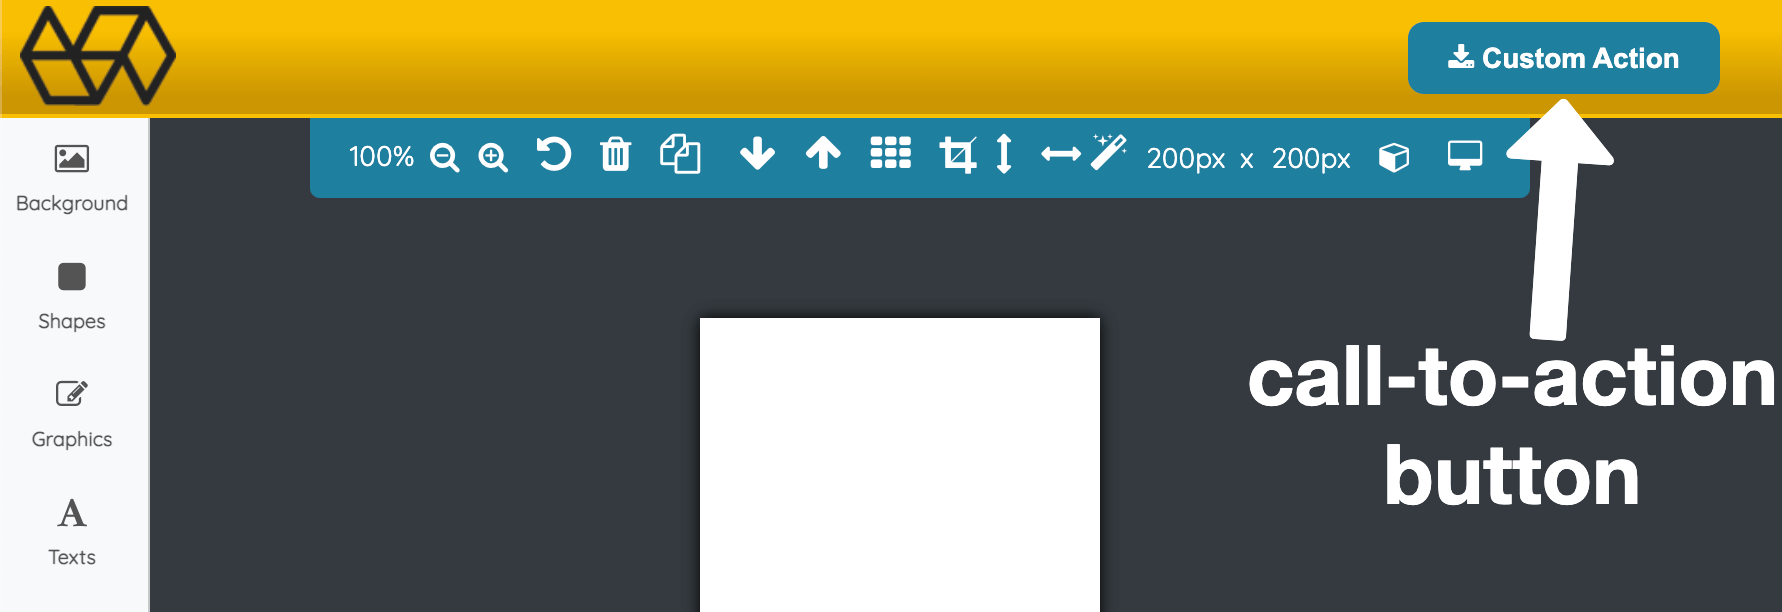
As soon as your user will have finished editing their document, clicking on the "call-to-action" button the following JSON payload will be pushed to your server endpoint (webhook_url):
{
   "status": "success",
   "created_at": "03-13-2021_20-1-23-812",
   "user_uid": "7r3C7FAjaofE4sVLyp5EsGM6MdD3",
   "width": 200,
   "height": 200,
   "public_png_url": "https://studio.pixelixe.com/storage/file/1fd7502e4dc3a3ddba65294f66ecf2b6/fa2d67146931484f09be18995b731501/image-03-13-2021_20-1-23-812.png",
   "public_html_url": "https://studio.pixelixe.com/storage/file/1fd7502e4dc3a3ddba65294f66ecf2b6/fa2d67146931484f09be18995b731501/document-03-13-2021_20-1-23-812.html",
   "document_name": "Untitled",
   "document_uid": "fa2d67146931484f09be18995b731501"
}
Within the editor, your users will be invited to click on a call-to-action button (top right corner of the editor) as soon as they will have finished editing their Document. Keep in mind you can rename this "call-to-action" button yourself from the "Customization tool" accessible from your Pixelixe account.
From your Pixelixe account, you can configure your white-label editor to decide whether you prefer to get created and edited Documents pushed to your server endpoint (WebHook URL) or sent to your email INBOX.
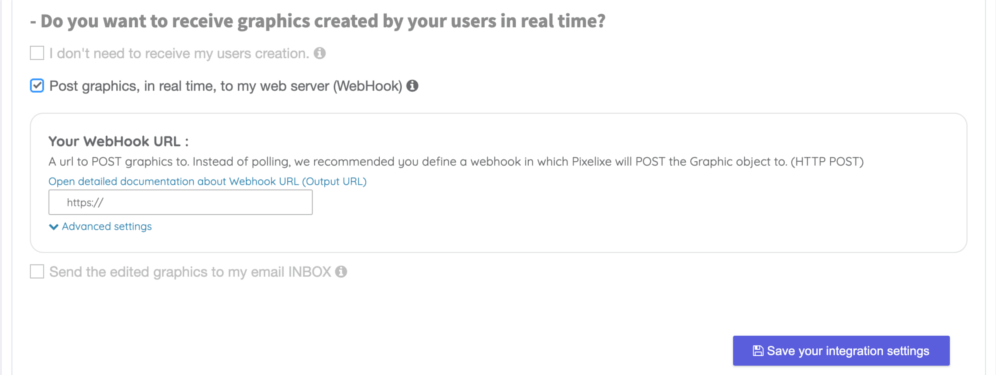
If you define your WebHook URL (your server endpoint), each time a user clicks on the "call-to-action" button you will receive in real time an HTTP POST request containing direct URLs of the edited graphic (PNG and HTML) within a JSON payload. Discover below an example of the static JSON payload that will be pushed on your server endpoint.
{
   "status": "success",
   "created_at": "03-13-2021_20-1-23-812",
   "user_uid": "7r3C7FAjaofE4sVLyp5EsGM6MdD3",
   "width": 200,
   "height": 200,
   "public_png_url": "https://studio.pixelixe.com/storage/file/1fd7502e4dc3a3ddba65294f66ecf2b6/fa2d67146931484f09be18995b731501/image-03-13-2021_20-1-23-812.png",
   "public_html_url": "https://studio.pixelixe.com/storage/file/1fd7502e4dc3a3ddba65294f66ecf2b6/fa2d67146931484f09be18995b731501/document-03-13-2021_20-1-23-812.html",
   "document_name": "Untitled",
   "document_uid": "fa2d67146931484f09be18995b731501"
}
Delete a Specific Document
curl "https://studio.pixelixe.com/api/document/delete/v2?document_uid=32f59312815640e186cf17fe3fd5c1d9"
  -H "Authorization: Bearer api_key"
The above endpoint returns JSON structured like this:
{
   "status": "success",
   "message": "Document deleted."
}
This endpoint deletes a specific Document.
HTTP Request
https://studio.pixelixe.com/api/document/delete/v2
URL Parameters
| Parameter | Description |
|---|---|
| document_uid | Unique Document identifier |
Image Automation API
curl "https://studio.pixelixe.com/api/graphic/automation/v2"
  -d json
- Example of a JSON Payload to POST to the above endpoint
{
  "document_uid": "32f59312815640e186cf17fe3fd5c1d9",
  "api_key": "afvkwxFgNSReMbYoCvFi0UkMFPP1z",
  "format": "json",
  "custom_field": "WHATEVER_YOU_WANT",
  "modifications": [
    {
      "element_name": "background-color",
      "background-color": "#101820"
    },
    {
      "element_name": "background-image",
      "image_url": "https://any-website.com/img/any-image.jpg",
      "width": "cover",
      "height": "cover",
      "visible": "true"
    },
    {
      "element_name": "text-0",
      "text": "Enter custom text here",
      "color": "#ffffff",
      "font-size": "72px",
      "visible": "true"
    },
    {
      "element_name": "image-0",
      "image_url": "https://any-website.com/img/product-cutout.png",
      "visible": "true"
    }
  ]
}
The above endpoint returns JSON structured like this:
{
   "status": "success",
   "created_at": "03-13-2021_20-1-23-812",
   "image_url": "https://studio.pixelixe.com/storage/file/1fd7502e4dc3a3ddba65294f66ecf2b6/fa2d67146931484f09be18995b731501/image-03-13-2021_20-1-23-812.png",
   "uid": "32f59312815640e186cf17fe3fd5c1d9"
}
Pixelixe Image Automation API enables you to auto-generate images such as social media visuals, e-commerce banners and more based on your saved Document (See section above). For this section, think of the documents (graphics) you created from your Pixelixe account as reusable templates and discover how to create unlimited variations of your already existing Documents with a simple JSON-based API.
Every text and image in a Document becomes an object you can modify via API. Simply hit the Image Automation API endpoint with your modification requests and in a few seconds an image will be generated and sent to your endpoint.
HTTP Request
https://studio.pixelixe.com/api/graphic/automation/v2
POST Parameters
Send as a JSON object
| Property | Type | Description |
|---|---|---|
| document_uid | string | The uid of the Document you want to change. An alternative can be to use the template_name parameter to tell the API which Document to change. |
| template_name | string | The saved name of the Document you want to change. An alternative can be to use the document_uid parameter to tell the API which Document to change. |
| api_key | string | Your API key |
| modifications | array | A list of modifications you want to make. |
| image_type | string | Choose either "jpeg" or "png". jpeg is recommended (smaller size). |
| format | string | See below for details. |
| custom_field | string | Optional, send additional alphanumeric data to the API request (input) and retrieve it in the API response (output). Ideal, if you want to send an internal ID or any information you want. This will work only if "format" = "json". |
Format options
Define the expected output format. The format property can be either image (by default), json, base64, pdf
| Format Option | Description |
|---|---|
| image | return a stream of the generated RAW PNG image (blob) |
| json | Stores the generated image on Pixelixe server and return a JSON document containing the direct URL (See example on the right side) |
| base64 | return a stream of the generated PNG image encoded in base64 |
| return a stream of the generated RAW PDF file (blob) | |
| html | Stores the generated HTML document on Pixelixe server and return a JSON document containing the direct URL (key : "html_url"). Convenient to re-open your variant into the white label editor (graphicUrl parameter in the IFRAME URL). |
Create Multiple Images
Use a Pixelixe Design Set as a multi-format template pack. This endpoint launches one Image Automation request per format included in the Design Set and returns a single JSON manifest for the whole batch.
Each format is resolved independently at runtime. Saved Design Set formats are executed through document_uid only when that document exists in users/{api_key}/graphics. Unsaved formats are executed through template_url. Library template packs must therefore be opened and saved into your own graphics before they become bulk-automatable. This means one batch can legitimately return, for example, 6 generated URLs and 1 format-level error.
curl "https://studio.pixelixe.com/api/graphic/automation/bulk/v2" \
  -H "Authorization: Bearer api_key" \
  -H "Content-Type: application/json" \
  -d '{ "design_set_uid": "7b21ff3e142311a7b9288ff2374c1b5f", "format": "image", "image_type": "png", "modifications": [ { "element_name": "text-0", "type": "text", "text": "Spring Launch" } ] }'
The above endpoint returns a JSON manifest like this:
{
  "status": "partial_success",
  "design_set_uid": "7b21ff3e142311a7b9288ff2374c1b5f",
  "requested_format": "image",
  "image_type": "png",
  "success_count": 1,
  "error_count": 1,
  "results": [
    {
      "name": "Instagram Post",
      "width": 1080,
      "height": 1080,
      "document_uid": "5c00d4bc927d4c37b2d3627ba6f2614e",
      "status": "success",
      "image_url": "https://studio.pixelixe.com/storage/file/.../5c00d4bc927d4c37b2d3627ba6f2614e.png"
    },
    {
      "name": "Pinterest Pin",
      "width": 1080,
      "height": 1500,
      "document_uid": "9f9a8d9f0bc14bcbbd644a6410e4bc99",
      "status": "error",
      "error": "Saved format document_uid not found in user graphics."
    }
  ]
}
Accepted input formats are image, html and pdf. The alias json is also accepted and behaves like image for compatibility with manifest-based workflows. The response is always a JSON manifest, even when the batch generates HTML or PDF assets.
Status Values
| Field | Value | Description |
|---|---|---|
status |
success |
All requested formats were generated successfully. |
status |
partial_success |
At least one format was generated successfully and at least one format failed. |
status |
error |
The batch failed before any usable result could be returned, or all child generations failed. |
results[].status |
success |
The individual format was generated successfully and returns an asset URL. |
results[].status |
error |
The individual format failed and returns an error message. |
Modifications Array
Your Image Automation payload should contain a parameter named modifications which is an array of modifications you would like to apply to a template.
All properties are optional, for example if you do not specify a color, the object's default color will be used. If your element_name is not found in the Document, expected modifications for this element will be ignored.
| Property | Type | Description |
|---|---|---|
| element_name | string | The name of the item you want to change. The element_name can also be background-image to replace or update attributes of the background-image (Ex: { "element_name": "background-image", "image_url": "http://any-url.com/imageofyourchoice.png" }) or can be background-color to change the background-color (Ex: transparent - { "element_name": "background-color", "background-color": "transparent" }). |
| image_url | string | Replacement image url you want to use (must be publicly viewable) |
| type | string | The type of the element you want to change. Either text, shape, icon or image. Existing payloads remain valid, but including type is still recommended for clarity. |
| color | string | Change the color of your element. Color hex of object e.g. "#0a00ff" or rgb color (or other CSS compliant property) |
| text-align | string | The text-align property sets the horizontal alignment of the inline-level content inside a text element. Supported values include right, left, center and justify. |
| font-size | string | (auto by default) Set to auto to automatically adjust the font size to fit the original text area (placed from the editor). Set to original to keep the original font-size from the source document. You can also choose any font size in pixel (px) Ex: 14px. |
| text | string | Replacement text you want to use |
| background-color | string | Change the background of your Document. Color hex of object e.g. "#0a00ff" or rgb color (CSS property). Use transparent to get a transparent PNG image. |
| border-color | string | For shapes, Color hex of object e.g. "#0a00ff" or rgb color (or other CSS compliant property) |
| border-size | string | For shapes, the size of the border in px Ex: 14px |
| font-family | string | Change the font if needed (Check if font is supported natively) |
| width | string | (auto by default for image items, cover by default for background images) Set to auto to automatically resize the new image keeping the new image ratio and dimension and center it into the original image item area (no stretching, no cropping). Set to cover to entirely cover the original image area with a cropped and centered version of the new image (stretching and cropping will be automatic). Set to original to keep the original width and height of the original image item (from the source document) and apply it to the new image. Finally, you can also input a new width for your element in pixel (Ex: set width:140px). |
| height | string | (auto by default for image items, cover by default for background images) Set to auto to automatically resize the new image keeping the new image ratio and dimension and center it into the original image item area (no stretching, no cropping). Set to cover to entirely cover the original image area with a cropped and centered version of the new image (stretching and cropping will be automatic). Set to original to keep the original width and height of the original image item (from the source document) and apply it to the new image. Finally, you can also input a new height for your element in pixel (Ex: set width:140px). |
| visible | string | Set to false to hide your item (element) |
| shape | string | Set to rounded to get a rounded image as an output (convenient for profile pictures). |
Legacy automation payloads remain valid and existing documents do not need to be migrated.
Compatibility Notes
- HTML templates that already contain advanced CSS keep rendering correctly in the cloud renderer.
templateEnginekeeps its legacy JSON modification surface for maximum backward compatibility.- The extended CSS-like fields are documented for the modern JSON-to-Graphic flow below, not for
templateEnginemodifications.
Code Snippets
Javascript Code Snippets:
fetch('https://studio.pixelixe.com/api/graphic/automation/v2', {
    method : "POST",
    body: '{ "document_uid": "32f59312815640e186cf17fe3fd5c1d9", "format": "image", "api_key": "6nm3JE0GoVWUai2wNEWiTLF66rk1", "modifications": [ { "element_name": "text-0", "type": "text", "text": "THIS IS" }, { "element_name": "text-1", "type": "text", "text": "A reusable Template" } ] }'
}).then(response => response.blob())
  .then(myBlob => {
        var reader = new FileReader();
        reader.readAsDataURL(myBlob);
        reader.onloadend = function() {
            var base64Image = reader.result;
            console.log(base64Image);
            document.querySelector("#generated-image").src = base64Image;
        }
  }).catch((error) => {
  console.error('Error:', error);
});
Python Code Snippets:
import requests

def main():
    r = requests.post("https://studio.pixelixe.com/api/graphic/automation/v2", data={ "json": '{ "document_uid": "32f59312815640e186cf17fe3fd5c1d9", "format": "image", "api_key": "6nm3JE0GoVWUai2wNEWiTLF66rk1", "modifications": [ { "element_name": "text-0", "type": "text", "text": "THIS IS" }, { "element_name": "text-1", "type": "text", "text": "A reusable Template" } ] }'})

    print(r.status_code, r.reason)
    file = open("automated_image.png", "wb")
    file.write(r.content)
    file.close()

if __name__ == "__main__":
    main()
Curl Code Snippets:
curl https://studio.pixelixe.com/api/graphic/automation/v2 -d 'json={ "document_uid": "32f59312815640e186cf17fe3fd5c1d9", "format": "image", "api_key": "6nm3JE0GoVWUai2wNEWiTLF66rk1", "base64": "true", "modifications": [ { "element_name": "text-0", "type": "text", "text": "THIS IS" }, { "element_name": "text-1", "type": "text", "text": "A reusable Template" } ] }'
Discover on the right panel some code snippets written in Javascript, Python and Curl to get started with the Image Automation API.
Test Image Automation API (2 clicks)
The Pixelixe platform includes an Image Automation API tester and will auto-generate the JSON payload with its default modifications array.
Click on the "Your Saved documents" menu from the dropdown menu to access the list of your saved graphics & templates. As mentioned before, every document can be automated.
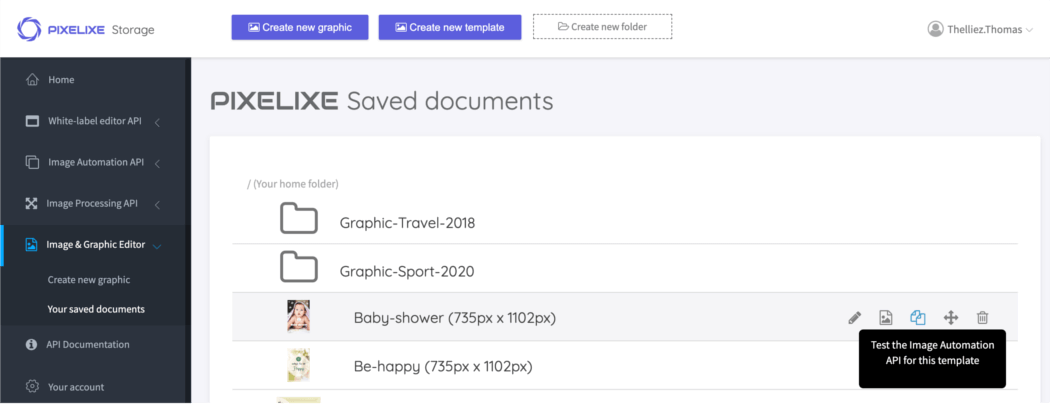
Move your mouse over a graphic and click on the button corresponding to the following tooltip "Automate image generation based on this model".
A pop-up will open and display the JSON document required to send modification requests to the API. You can tune the modifications section of the JSON directly into the popup to generate variations of your image.
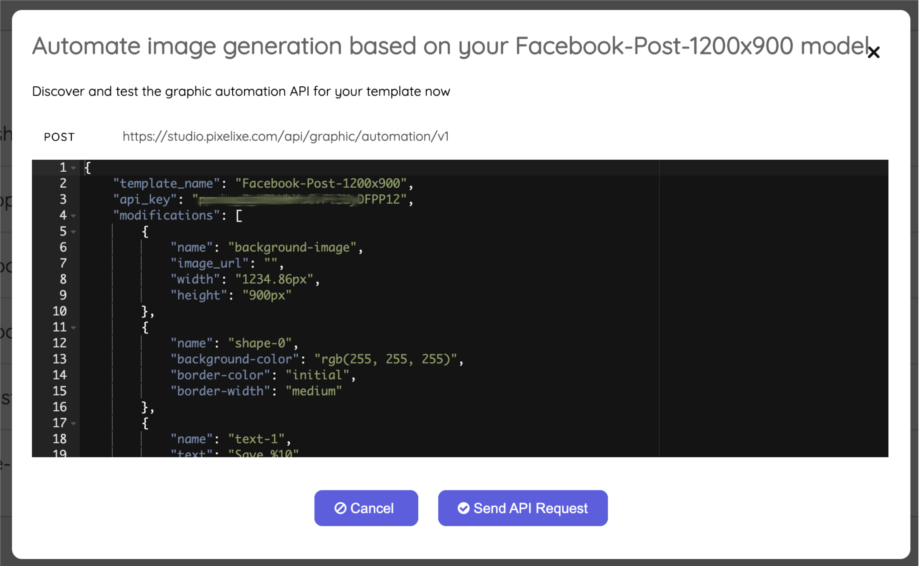
Once you are happy with your template, you are free to duplicate this JSON document to ease your API integration process.
Error handling
If no errors occur, the API will return a (200, 'OK') HTTP status code. If an error occurs, the HTTP response status code will be 400 and the response will be a JSON document with the following structure.
{
   "status": "error",
   "message": "Bad or missing JSON (unexpected structure)"
}
| Error message | Status code | type |
|---|---|---|
| Bad or missing JSON (unexpected structure) | 400 | JSON |
| Missing JSON document | 400 | JSON |
| Bad JSON format (unexpected structure) | 400 | JSON |
| No template to generate image (template_name or template_url parameters missing) | 400 | JSON |
| Please provide your API key | 400 | JSON |
| No "ELEMENT_NAME" parameter found in the template | 400 | JSON |
| Template not found | 400 | JSON |
| Not enough Credits to perform this request : "YOUR_CREDITS". Please, upgrade your account | 400 | JSON |
| Wrong API Key : API_KEY | 400 | JSON |
| An unexpected error occured. We will investigate this issue. Please, contact inquiries@pixelixe.com to get more detail. | 400 | JSON |
JSON to Graphic API (NEW API for your AI)
Automate your graphic creation workflow end-to-end (100% headless). Create editable HTML graphics from scratch using a single JSON request. You can return either an HTML document directly (compatible with Pixelixe Studio White label version) or save it to your Pixelixe storage space to edit in Pixelixe Studio or automate variations with the Image Automation API.
This API combined with the Image Automation API is perfect for AI (LLMs) to autonomously generate designs and reusable templates from scratch, then leverage Pixelixe’s automation capabilities to produce infinite variations programmatically.
curl "https://studio.pixelixe.com/api/jsontographic/v2"
  -H "Authorization: Bearer YOUR_API_KEY"
  -H "Content-Type: application/json"
  -d '{
    "document_name": "sneaker_launch_01",
    "save_document": true,
    "width": 1080,
    "height": 1080,
    "background_color": "#ffffff",
    "background_gradient": "linear-gradient(135deg, #f8fafc 0%, #dbeafe 100%)",
    "background_filter": "brightness(102%) contrast(101%)",
    "modifications": [
      { "name": "headline", "type": "text", "text": "New Sneaker Drop", "top": 80, "left": 60, "font-size": 72, "color": "#111111", "font-family": "Anton", "font-weight": 700, "text-transform": "uppercase", "word-spacing": "4px", "text-stroke-width": "1px", "text-stroke-color": "#ffffff", "text-align": "justify" },
      { "name": "hero-image", "type": "image", "image_url": "https://example.com/sneaker.png", "top": 240, "left": 120, "width": 840, "height": 600, "filter": "brightness(105%) contrast(103%) saturate(112%)", "object-fit": "cover", "object-position": "center", "box-shadow": "0px 18px 40px rgba(15,23,42,0.16)", "border-style": "double" },
      { "name": "cta-shape", "type": "shape", "top": 900, "left": 60, "width": 260, "height": 96, "background-color": "#2563eb", "background-gradient": "linear-gradient(135deg, #2563eb 0%, #1d4ed8 100%)", "border-style": "dashed", "border-size": "3px", "border-color": "#bfdbfe", "box-shadow": "0px 12px 28px rgba(37,99,235,0.22)" }
    ]
  }'
When
save_documentis true, this endpoint returns JSON withdocument_uid,html_urlandimage_url.
{
  "status": "success",
  "created_at": "02-24-2026_16-12-33-145",
  "document_uid": "9fcb0b2f24c9a8b1d1f1d2b4b6a7c8d9",
  "html_url": "https://studio.pixelixe.com/storage/users/API_KEY/document-02-24-2026_16-12-33-145.html",
  "image_url": "https://studio.pixelixe.com/storage/users/API_KEY/image-02-24-2026_16-12-33-145.png"
}
Preferred root-level keys for this modern JSON flow are background_color, background_gradient and background_filter. Inside modifications, advanced style keys keep the CSS-like dash notation used by the editor, such as font-weight, text-transform, word-spacing, text-indent, text-stroke-width, text-stroke-color, border-style, box-shadow, filter, background-gradient, object-fit and object-position.
This makes it possible to create documents from scratch, save them, reopen them in Pixelixe Studio, and render them through the cloud renderer with the same advanced styling.
Image Filter API
Follow this link to access the Image Filter API documentation
Apply photo effects and filters to your image with our ready-to-use API and presets.
Supported image types:
- jpeg
- png
- bmp
- tiff
- gif
Filter list :
- Blur
- Grayscale
- Invert
- Sepia
Follow this link to access the Image Filter API documentation
Image Processing API
Follow this link to access the Image Processing API documentation
Manipulate and transform images and photos, from your webapp in real time with our easy-to-use APIs.
Supported image types:
- jpeg
- png
- bmp
- tiff
- gif
Processing API list :
- Compress
- Resize
- Crop
- Flip
- Rotate
- Brightness
- Contrast
- Opacify
Follow this link to access the Image Processing API documentation
Deprecated API V1
For users who subscribed before April 2021, the previous documentation V1 is available here Pixelixe docs V1