API Documentation
How to access your user's designs (graphic/image) and redirect your users on your site
Introduction :
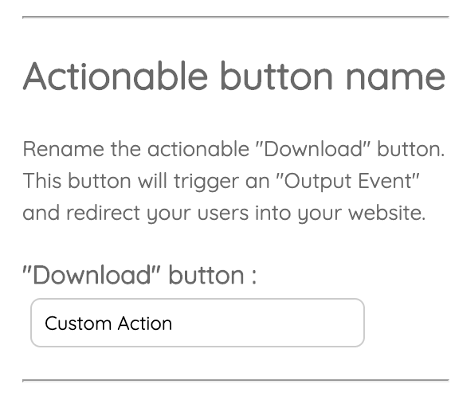
Within the embedded Studio, your users will be invited to click on a "actionable" button as soon as they will have finished editing their graphic/image. Keep in mind that, you can rename the actionable button yourself from the "Customization tool".
You can configure, from your Pixelixe account, how to process documents when your users will click on this "actionable" button.
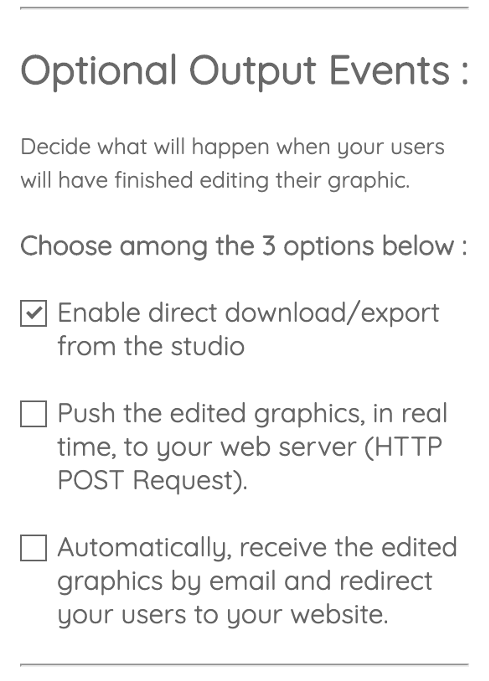
3 Output options are available from the customization tool.
- Option 1 Your users download their graphics directly from the studio (OPTIONAL: Your server receives created and edited graphics).
- Option 2 Your server receives created and edited graphics in real time and simultaneously redirect users to your website (on the URL of your choice).
- Option 3 You receive created and edited graphics in your INBOX (via Email) and your users are redirected, in real time, on the URL of your choice. (Ideal for Print workflows or if you do not have web developement skills)
Option 1 Your users download their graphics directly from the studio (OPTIONAL: Your server receives edited graphics)
If you do not have development skills at all and that you want to offer your visitors a nice graphic and photo editor. This could be the perfect option for you. Nothing to set up except selecting this option from our "Customization tool" (no code option).
OPTIONAL: Receive edited graphics on your server endpoint
Your server can be notified in real time as soon as users click on the "Downlaod" button adding the outputURL parameter to your API call:
Option 2 Your server receives created and edited graphics in real time and redirect users on the URL of your choice. (Recommended -> Most used option.)
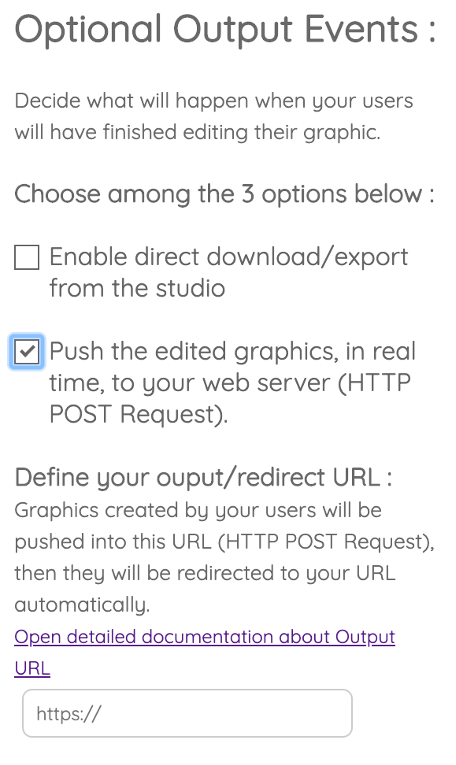
Your website and platform can have full control over graphics/images created or edited by your users! With this option, as soon as your users will click on the actionable button, our platform will submit a basic HTML form, redirecting your users meanwhile pushing you the output documents.
This HTTP POST will be performed on the URL of your choice (Configure your "Output/Redirect" URL). Once you receive those documents (HTML, PNG or PDF), you are free to store those designs wherever you want on your server (to allow users to re-edit them later for example).
- How your server will be notified when your users get finished editing their graphic/image ?
- Where to define your Output/Redirect URL ?
- What parameters will be posted on your Output/Redirect URL ?
- Can I decide whether users should download graphics directly from the studio or not?
- Can I customize the actionable button used by users once they will finish editing graphic/images?
- How to redirect your user after their edits ?
How your server will be notified when your users get finished editing their graphic/image ?
From the studio, your users will be invited to click on an "actionable" button as soon as they will have finished editing their graphic/image. You can configure this button label anytime from the "Customization tool".
Our platform will submit created designs and automatically redirect, in real time, your users or visitors to the URL of your choice. If you choose "Option 2", our server will submit an HTML form to your server endpoint containing the created graphics (PNG, HTML and/or PDF). Or if you choose "Option 3", of course, you will receive graphics in your email INBOX.
This form submission (HTTP POST) will be performed on the URL of your choice (Configure your "Output/Redirect" URL)
Find out here what parameters will be posted on this "Output/Redirect" URL ?
Where to define your Output/Redirect URL ?
Redirection to your website are available both, with Option 2 or 3. You can define your "Output/Redirect" URL from the "Customization tool" (accesible from your dashboard). Scroll down the list of customized fields until you read "Optional Output Events".
Check the best option for you and a hidden field will slide down and magically appears. (See image below for an example)
What parameters will be posted to your Output/Redirect URL ?
Basically, Pixelixe Studio will submit an HTML form with the following elements directly to your server endpoint:
    <form action="YOUR OUTPUT/REDIRECT URL" method="post" >
        <input type="hidden" name="uid" />
        <input type="hidden" name="graphicName" />
        <input type="hidden" name="b64PNG" />
        <input type="hidden" name="b64HTML" />
    </form>
Here is the list of parameters:
- the graphic/image name ("graphicName")
- the graphic/image as a PNG image ("b64PNG" encoded in the POST request in base 64)
- the graphic/image as an HTML document ("b64HTML" encoded in the POST request in base 64)
- the graphic/image as a PDF document ("b64PDF" encoded in the POST request in base 64) if you set the "pdf" parameter to "true" in your IFRAME API call
- Your uid (See this doc to set your internal identifier). (Optional field that you can pass as parameter when opening the Studio with an IFRAME).
Pixelixe Studio import/export mechanism supports HTML document. Therefore, the "b64HTML" is essential if you want to reopen draft or already existing graphics into the Studio later. (You can't reopen RAW image or PDF files)
Once you will decode the base64 "b64HTML" parameter, we strongly recommend you to store this HTML file on your server. For example, to allow your users to update their creations later.
Moreover, once decoded, we strongly recommend you to store the "b64PNG" image on your server as well. For example, you might want to use this image as a preview to display all your users's graphic created once authenticated.
WARNING : As a reminder, the Studio can edit HTML templates only if they have been exported/downloaded from the Studio itself. (You cannot import external HTML files.)
Find below more details about parameters that will be pushed to your OUTPUT URL each time one of your users will have finished editing a graphic or image inside the studio.
| Parameter | Type | Description |
|---|---|---|
| uid | string |
If you passed a uid in the request opening the studio, you will get back the exact same uid in this POST.This way you have an easy way to match connected users on your site with their documents posted on your server. If none, the returned uid will be empty. |
| graphicName | string |
If you passed a graphicName in the API call to open the studio, you will get back the same graphicName. If you allowed your users to modify the name themselves within your embedded Studio, you will receive their updated name. (You can decide to let them modify the name from the unchecking the "Document name input field" from the "Customization tool") |
| b64PNG | string |
Base64 encoded PNG image of the graphic/image edited by the user. |
| b64HTML | string |
Base64 encoded HTML document of the graphic/image edited by the user. This document can be imported again anytime in the studio using the "graphicUrl" parameter. Find here how to re-edit a stored document in the studio |
| b64PDF | string |
Base64 encoded PDF document of the graphic edited by the user. This parameter will be pushed to your server only if you set the "pdf" parameter to true in the API call used to open the studio. Find here how to add the "pdf" parameter while opening the studio. |
Can I decide whether users should download graphics directly from the studio or not?
Yes, by default, "direct downloads" from the studio are disabled. You can check and enable this settings from the "Customization tool" anytime (See image below). If checked, your users will be able to download their document directly from inside the studio.
WARNING : Your OUTPUT URL won't receive your users' creation in this case. You won't be notified when they get finished editing either.
If unchecked, they won't be able to download edited documents from the Studio. Your server will receive their creation either from the POST on your OUTPUT URL and you will be in charge of delivering their creation anytime you want or either from EMail. (See image below to understand where to check/uncheck from the "Customization tool").
Can I tune/customize the Call-to-action button used by users once they will have finished editing graphics/images?
Yes, from the "Customization tool", you can change the label of the actionable button that will trigger the HTTP POST on your OUTPUT URL. You can change the name anytime (Ex : Save, Next, Download, Validate)
How to redirect your user after editing ?
As explained in the previous section, As soon as your users will have finished editing, Pixelixe studio will submit a form, directly from the user web's browser, containing the created graphics on a server endpoint on your platform. That's when your users are redirected on your platformFrom there, you are in full control of the user experience .
For example, you can display a message (html page) explaining to your users that you susccessfuly saved their work or you can provide your own download button on the next screen. Or you can even redirect them elsewhere.
Option 3 You receive created and edited graphics in your INBOX (via Email) and your users are redirected, in real time, on the URL of your choice. (Ideal for Print workflows or if you do not have web developement skills)
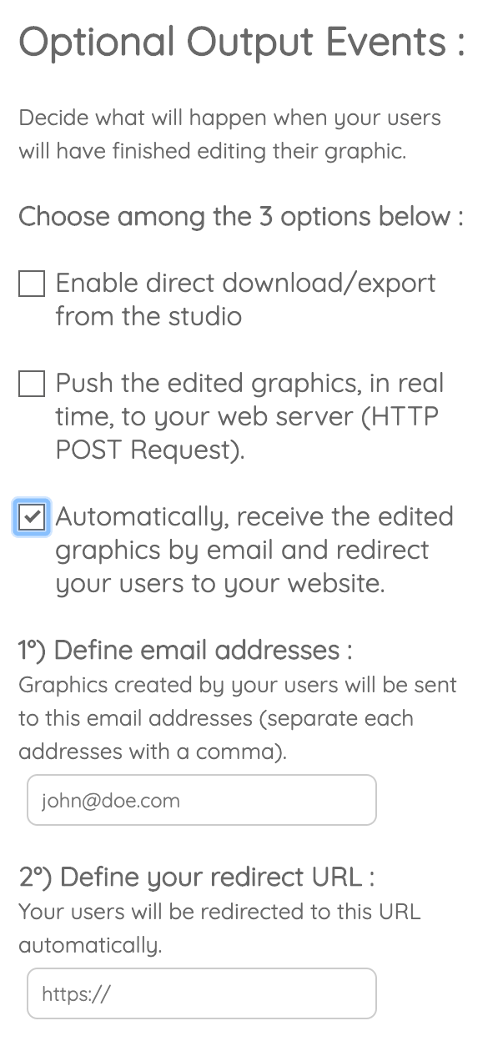
With this option, as soon as your users will click on the "actionable button", our platform will automatically send created and edited documents into the INBOX of your choice (You will receive documents attached in emails). If you choose the "Email" option from the customization tool, your users will be redirect on your website on the URL of your choice (called the Redirect URL).
If you added a uid (Unique identifier) when opening the studio in your platform, you will be able to search your inbox with this uid, you can therefore match your customers with their graphics easily.