![]()
If you are not a developer and have no technical skills, you may have heard about NoCode tools. The NoCode movement is particularly famous these days.
It is now possible for anyone to create apps and launch online businesses without writing a single line of code. Indeed it is no longer mandatory to find a technical cofounder (aka CTO) prior to launching a startup.
NoCode tools are not specific to a single domain. You can find tools available in a large variety of domains (marketing automation, app development, workflow automation , etc..).
Some of the most famous tools are for example, Zapier, Airtable, Integromat, MailChimp (email marketing) or HubSpot (Social Media).
In the area of app development, one of the most growing actor on the market is Bubble.io
What is Bubble.io?
Bubble is a no-code app building platform designed to help you build software and applications without programming. Say simply: You no longer need programming skills to build an app. Awesome, right?
The story behind Bubble.io is also really interesting to read. Two Harvard graduates bootstrapped their startup from early 2011 until now. Discover here, their journey from $0 in revenue until today.
A few years ago, developing apps was only for people who:
Knew how to code
Had a ton of money to delegate coding
As you know, this was quite an issue for lots of “wannabe entrepreneurs”.
Fast forward to today, that’s not the case anymore. Today, it does not matter if you just want to build a hobby app for personal use, or a complex piece of software built to run an entire large-scale business on, no programming is required at all.
Image Automation and Banner generation API
If you are already familiar with Pixelixe Image Automation API, here is a quick summary. The Image Automation API allows users to generate unlimited variations of a banner or a graphic on the fly. Every text, color and image in a graphic can be modified via our API. Which makes it really convenient to industrialize and automate content creation.
Whether it is to automate banners for your entire product catalog if you are an ecommerce shop owner or to automate creation of email images or social media graphics.
Our Image and Banner Automation API becames really popular and can be easily integrated in a variety of NoCode tools.
Today, we are happy to showcase in this article, how to embed into your Bubble.io app a banner generator or an image generator in less than 10 minutes.
How to create your first banner or graphic template and get started with the API
From your Pixelixe account, choose a template among our presets or start from scratch creating your own custom graphic using our online Graphic Design tool.
Keep in mind that every text or image that you will put on this graphic/template can be changed with the API on the fly. Even the background image or color can be updated as well. Any graphic created with the Pixelixe editor can become a template and be automated.
You can see in the screenshot below the graphic (aka template) we made in 30 secs specifically for this article:
Once you are happy with your graphic, the fastest way to move toward the integration of your API in a tool such as bubble.io is to hover the “Automate” button located in the top main navbar, near the blue “Download” button.
Hovering this “Automate” button will give you 3 options. Choose the last one, “Automate API Tester” and click on it. You will be redirected you to your Saved Documents and Automation dashboard as you can see on the screenshot below. By the way, this Automation API Tester can also be launched directly from your “Saved” documents hovering the design of your choice and then the “Automate” options.
Anyway, you may be wondering why we need to go to this dashboard as we just want to consume an API.
Well, you are right, this is optional, you can also simply click on the “Save” button, close the window and start reading our online Image Automation API documentation.
But, using our Automation API Tester will save you a precious time, because this will automatically generate the JSON Payload required to consume the API.
Indeed, the JSON payload will automatically be generated and be composed of all adaptable items (text and image within your graphic). Once you have this payload, generating a new graphic becomes a lot easier.
From this screenshot, you can easily understand that the API URL is :
** https://studio.pixelixe.com/api/graphic/automation/v2 ** and that the JSON Payload must be sent to the API using the POST HTTP method.
If you are new to Pixelixe and if you have never tried our Image generator, feel free to update the “text” label within the JSON payload and hit the “Send API Request (Test)” button. You will instantly see a generated banner based on your changes. This is that simple.
The JSON payload might seem complicated for non technical people but you will quickly understand how it works: You can see the modifications array. Array in JSON are represented by brackets. Inside this array, each element of your graphic are available. The “background-image” element being the first, you can change the background image URL as you can see on the screenshot above. You can also change the “text” label of each text element placed on your graphic. The name attribute matches the element id you can rename within the editor.
Bubble.io API Connector settings
Ok, so now your Image Generation API is ready to be integrated into Bubble.io. We won’t cover how to build a Bubble.io app in this article as you will find plenty of articles covering this specific topic on the web. We took the assumption that you are already familiar with the tool.
Basically, it is not at all complicated to get started with Bubble.io. First, register to get your account and create your first app:
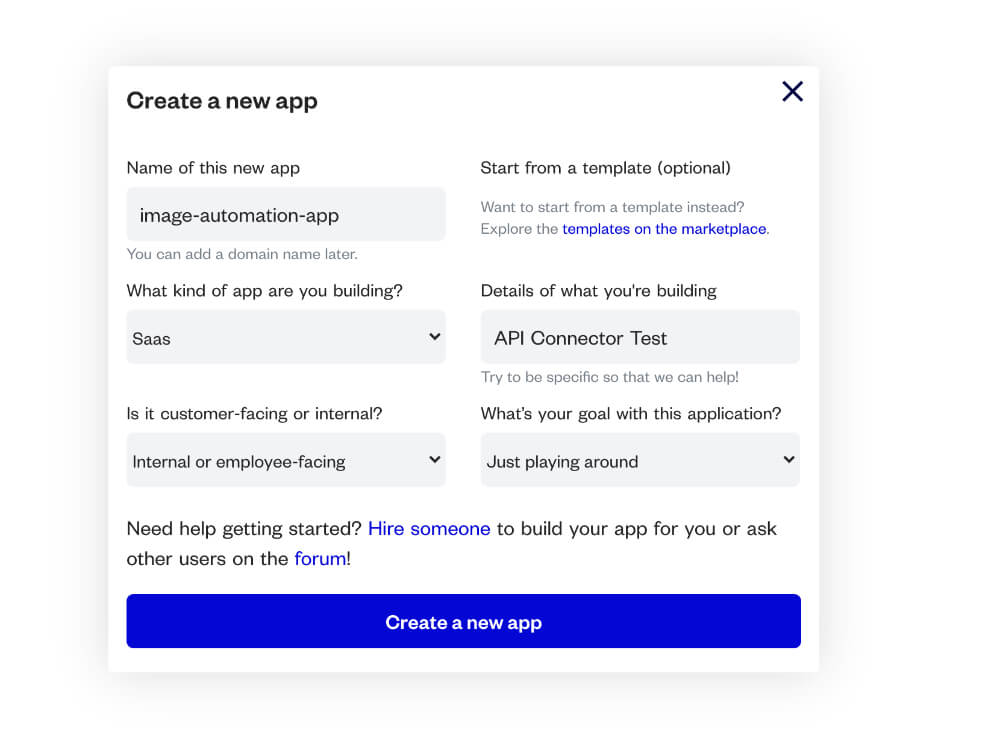
Once created, you will be redirected to the Bublle App Builder:
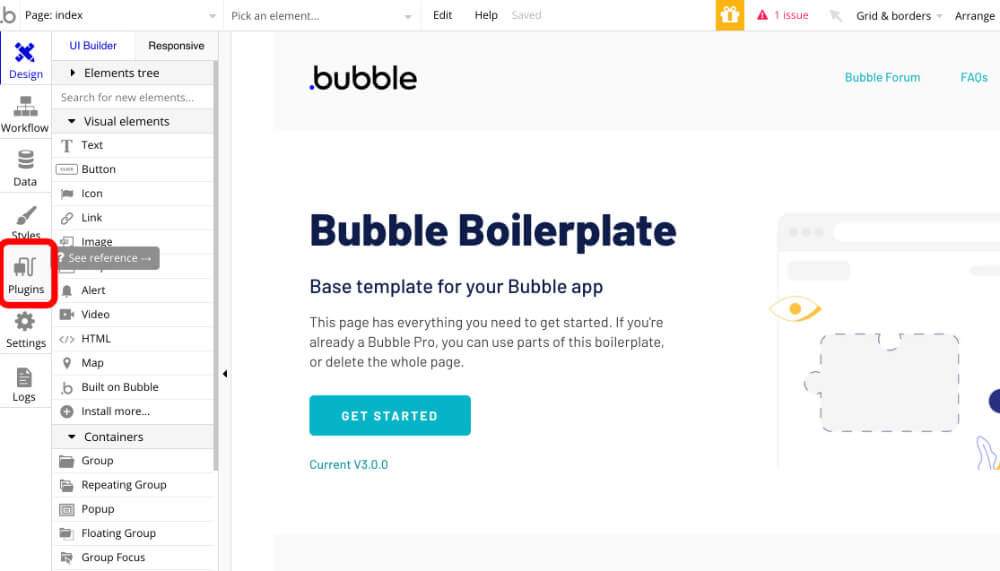
Click on the “Plugins” button located in the left toolbar (between Styles and Settings) and search for “API Connector” in a search bar.
Click on the “Install” button and then on “Add another API”.
You can now set up your Pixelixe API settings and payload. You will see it is not complicated and takes less than 2 minutes.
Set the “POST” HTTP method, copy paste the entire API URL: https://studio.pixelixe.com/api/graphic/automation/v2
- Name: Choose whatever you want
- Data type: JSON
- Body type: RAW
Nothing complicated, now two things to do absolutely if you want to get a successful reply from the API. First, add “format”: “json”, to your payload in the main parent object (see screenshot below). Second, click on the “Add header” button and write “Content-Type” in the Key field and “application/json” in the Value field. This header will tell the API Connector that you are requesting to get a JSON response from the API. Without those two important settings, you won’t get the expected result.
Indeed, our Image Automation API can return a variety of response format, either:
RAW PNG,
RAW PDF,
RAW HTML,
JSON (with the generated image URL in the response),
And more
As you may have seen, the JSON Payload located in the “Body” field can contain dynamic values which is awesome.
With this, for example, your user could generate images based on a text they wrote in your app.
Once you set up that information, click on the “Initialize call” button located below the JSON payload.
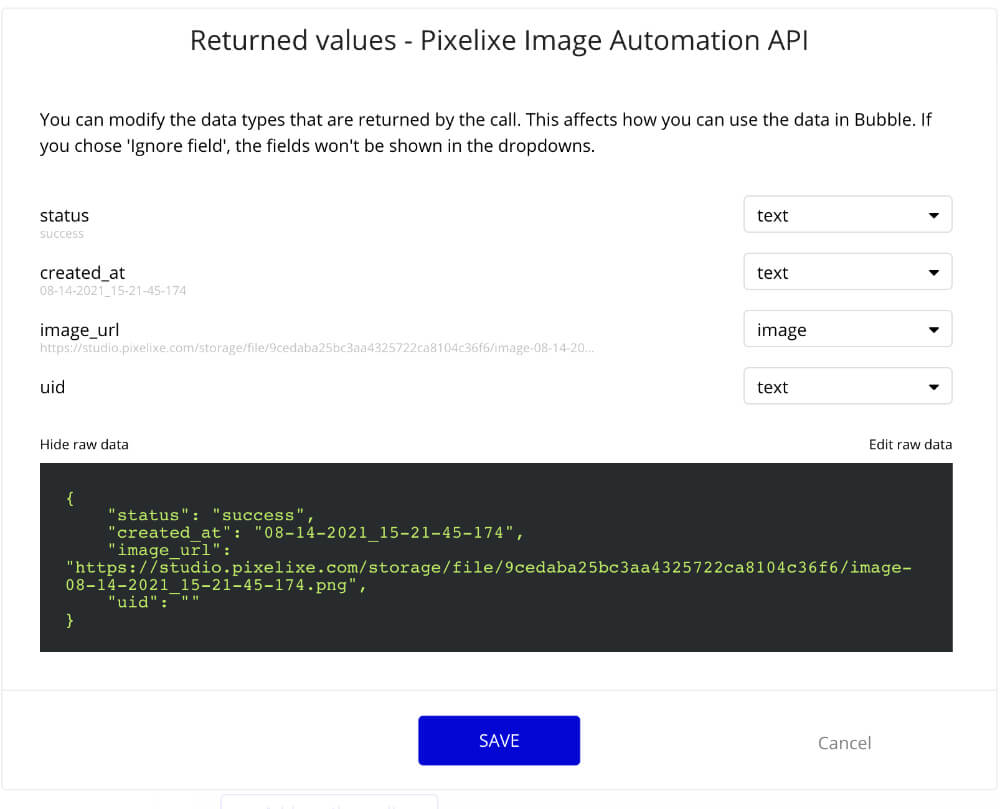
You will receive the following JSON response:
Conclusion
As you can see on the last screenshot, Bubble.io API Connector plugin automatically parsed the JSON response. The third item is the image_url of your new generated image. You can now integrate this image wherever you want. The only limit is your creativity to master workflow automation and create imersing user experience using Bubble.io.
Building complex apps with amazing user experience is now more possible than ever. We wish you all all the best with our set of APIs.
If you are interested to learn more about Bubble, you can also read our last article describing how to embed a photo editor in your NoCode Bubble app